Saturday, November 1, 2008

Out of the blogging world...

I have been out of the blogging world for quite sometime!! My family has been sick for the past two weeks, just passing colds, coughs, fevers to each other. No Fun!!

Well, today I had it all planned. We were going to launch our new site (new name and all) and do a giveaway. But, because of my sickness, that has kinda set me back! I am really excited about the new site, that I am just going to post about it anyways and the giveaway will be on Monday...with new things in the shop as well! Awesome new things in the shop!!

Introducing...

Crafting in Laymon's Terms


Go check it out! So from now on...all of our posts, crafting ideas, tutorials, and everything else will be posted on the new site. Hope you like it :)

Monday, October 20, 2008

My new found love with scrapbooking!

I have discovered DIGITAL scrapbooking!! I know it has been around for awhile now, but I have just recently started using it and I love it. I have made some cute pages, cards, calendars, and blog layouts so far. I think it is fun to create these things using all the cute digital scrapbooking kits, papers, and embellishments. Fun! I thought I would share some awesome digital scrapbooking sites that I have found:

Scrapblog

Free Digital Scrapbooking

Shabby Princess

The "Kreative Karma"

DigiFree

Digital Scrapbook Place

I know there are other great sites, but I haven't found them yet!

Saturday, October 18, 2008

Awesome Giveaway on SITS

How cute is this Tot Tote?! Visit SITS (The Secret is in the Sauce) site and find out how you could enter to win one!!

Friday, October 17, 2008

Recycled Capri Sun Items

I thought this was a great idea. My daughter went to a b-day party last weekend and everything was "green" for all of the people trying to recycle. They gave these out as goody bags.
They have some great ideas. and products. www.terracycle.net

I also found this great link to Skip to MyLou's website where she does a tutorial on how to make them.http://www.skiptomylou.org/2008/08/13/a-recycled-pencil-bag-for-the-first-day-of-school/

Tuesday, October 7, 2008

Coming soon!!

I went to a baby shower tonight and I thought this monkey would be really cute to make and give as part of the gift. My favorite thing about this monkey is the face and the twisty tail! So cute! And...I am almost done making another one and it will be up in our etsy shop soon. I am so excited about this, because I love making these monkeys and they are so cute!!

I also made these Bakerella cupcakes to bring to the shower. Both of my little girls loved helping me make these. And they are yummy!!

Also...here is a little sneak peak of what is coming to our etsy shop soon!! So check back by the end of the week to see the whole picture :)

Saturday, October 4, 2008

Chipboard Boxes

Another great idea for a quick and easy gift or to give away. I did these boxes up for my 5 yr old daughter's birthday party. Instead of favor bags, I did these boxes. She is having a Disney themed gymnastics party so I ended up mod modging disney paper onto the 4 sides of the boxes and then the top. For the sides, I took stamp pads and stamped around them and then I added a bow to the Cinderella one, and paper to another one.

Mom-prenuer Shop-a-thon!!

Laurie at Tip Junkie is amazing! She has started a Mom-prenuer Shop-a-thon to help support the hard working Mom-prenuers...including us :)

Click here
to find out all the details about the shop-a-thon. And look for Sisterly Love Card Co's etsy shop too!!


Monday, September 29, 2008

Homemade Tortillas

Today's post is about cooking not crafting. But, these homemade tortillas were really good so I thought I would share the recipe.

My sister and I made our own tortillas yesterday for our taco dinner. I was surprised that they are really easy to make and the best part...you can store all the extras in the freezer for a very long time. My kids and I love quesadillas and eat them every day, it's the only thing my picky eater will eat. So storing the left overs for a couple of months is really nice. But, the ones we made yesterday did not make it to the storing process, because we ate them all :)

Enjoy!

There are lots of recipes out there, but this is the one that we chose to use. Click here to see the recipe on Insta Spanish website. We did double this recipe and made 19 tortillas.

Ingredients:
3 cups of flour
1/2 a cup of shortening (Crisco)
1 tablespoon of baking powder
1/2 tablespoon of salt (salt to taste)
1 to 1 1/2 cups of hot water

Cooking Tools:
medium sized mixing bowl
rolling pin
measuring cups
measuring spoons
cutting board or flat surface to roll tortillas on
skillet or grill


In a mixing bowl combine all of the dry ingredients. Then add the shortening & knead it into these dry ingredients. Slowly add the hot water (we added a couple of tablespoons at a time, kneaded it, added some more tablespoons of water, etc) and continue to knead slowly until it forms a dough like consistency. Make sure not to add too much water - as this will result in your dough being too sticky. If your dough begins to get too sticky, just add a little more flour.

Let the dough stand for about 1/2 hour. (I kneaded the dough a few times before I rolled them into little balls). Then you can make little balls of dough.
These little balls of dough should be about about 2 to 3 inches in diameter.

(we had 19 balls rolled out, I just took the picture too late!)

Then you take the balls and roll them into tortilla like shapes with your rolling pin. (they probably won't be circle, they are going to be an odd shape). Roll the tortilla so it is about 1/8th inch thick...or very thin.


Once you get the desired size, put them 1 at a time into your skillet and cook over a medium flame. Cook the tortilla on each side for about 30 seconds.


You can use a spatula or your fingers to flip the tortilla over once it looks done. You'll know when they are overcooked, becase they will begin to burn!

Gently roll the rolling pin over the tortilla while it's on the grill (we did not do this step and ours cooked evenly). And that's it!


Ta Da! Our tortillas!


We used this site to help us know how to knead the dough and roll out the tortillas. It was helpful for us!

Thursday, September 25, 2008

Wow!!

First it is a wonderful day because it is my BIRTHDAY!!

And then I found out that we are featured on Tip Junkie today for Teach Me Thursday. How awesome. Go look at all the great features that are on the Teach Me Thursday today :)

Wednesday, September 24, 2008

Etsy Shop

New products in our Etsy Shop. Click here to check it out!! Here is some of the new items.

Tuesday, September 23, 2008

Tutorial Tuesday

Shirt-Dress:

When I am making dresses for my little girls, I do not enjoy making the sleeves. So I thought that I would try something a little different. I took one of my daughters plain t-shirts and turned it into a dress (it's all she wears!!)

First get a plain t-shirt, and cut it a few inches below the sleeves. You can cut it wherever you want depending on where you want the skirt part of the dress to start.

Then go measure your little one and cut out the skirt part. It's going to be longer then a normal skirt since it is attached to the shirt near the chest area. And remember to leave some length for the hem. (Cut 2 pieces, one for the front and one for the back)


I don't have a picture of this, but....turn the shirt inside out and cut along the side seams (very carefully) about 1 3/4 inches (you can see the cut in the picture below).

Then put right sides of the shirt and fabric together and pin the skirt along the cut edge of the shirt. I found it easier to pin both of the sides first and then pin the middle.

Then sew along the edge.

I sewed along the edge twice.


Then cut the extra fabric off, but be careful not to cut the stitching off.

Repeat the above steps for the back of the shirt too.


Then pin the sides and sew.

Last step - Hem the bottom of the dress.

Ta Da....a shirt turned into a dress! It was really easy to do this and my daughter loves it.


(I hope my tutorial makes sense, you can always ask questions if you don't understand something :) )

Wednesday, September 17, 2008

Tuesday, September 16, 2008

Tutorial Tuesday

This weeks Tutorial is about Candle decorating. It is so easy to do and they make great gifts.

You need a pillar candle, alcohol, and rub-ons. Put some alcohol on a papertowel and rub it on the candle to clean the sides. This just helps things stick to it better. After you let it dry a minute or two, then you are ready to go. Take you rub-ons and put them on the candle and you are finished.

I decided to do flowers on the bottom and then some indiviual flowers all around it. I cut around each flower that was going to rub-on to make sure that nothing extra would rub-on as that happens sometimes.


Sunday, September 14, 2008

New product in Etsy Shop!!

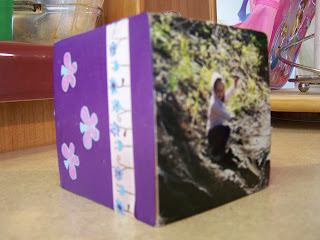
It's here!! Scrapblock set for sale in our etsy shop. I am so excited about this, because I really like these scrapblocks. They are so cute. Go check it out


Friday, September 12, 2008

Letters and Shadow Box Picture Frame

I just finished making these letters for my daughter. The wooden letters were only a $1 at Michaels...awesome! I love how they turned out. I think I am going to attach some cute ribbon to the back and hang them on her wall.


I had this shadow box picture frame laying around forever so I decided to try and do something cute with it. I saw the little clothespins at Michaels and had to buy them. They were cheap and so cute! First I drilled two holes on both sides of the frame for the ribbon to go through. Then I painted it blue and put some cute paper on the back. And hung my girls cute pictures with the clothespins. Cute!!

Wednesday, September 10, 2008

Busy, Busy, Busy!!

I am so behind on my blogging!! I have just been so busy with school (taking two classes this semester), my girls, and with crafting. I have some great projects that I am finishing up. I am so excited to post them so stay tuned. By the end of the week, hopefully, I will get my new sewing and crafting projects posted :)

In the meantime, check out this awesome giveaway! Two words...CIRCUT EXPRESSIONS!
Click here to go visit the SITSa at The Secret is in the Sauce and find out all the details about the giveaway.

Monday, September 8, 2008

Party Favor help

Okay all you creative people, I need your help. My youngest daughter will be turning 5 next month and is having a gymnastics party. There will be both boys and girls at her party. Her theme is Minnie Mouse, but she let me change it slightly to include all Disney characters, since everything is so cute. I think we are inviting 15 kids.

Now for the problem, I would really like to come up with at least 1 really cutesy craft idea that is easy, and cheap, to make to give away with goody bags, or instead of goody bags.

I feel like I am getting the same things like tattoos, pencils, make-up stuff. Things like that, which is fine and I know kids love that stuff, but I would love to come up with somthing to kind of help my sister and I get our name out there, with people like WOW! What a great idea.

Friday, September 5, 2008

Decoupage Picture Frames

These are a couple of picture frames that I made. I love them!! You can also see them in our etsy shop.


Thursday, September 4, 2008

Freezer Paper Stencils

This post goes along with one that Katie posted a tutorial for a little bit ago about the great idea we saw about Freezer Paper Stenciling. I did attempt it this morning and made a t-shirt for my daughter. Here is how it turned out.


I am big on the Cricut and I use it a lot for my projects since it makes lettering and other shapes so easy to do. I used it to make a stencil of the Gymnast word. I also used acylic paint for both designs and then put sparkly blue fabic paint over the words. So they are actually a slightly darker blue than the girl.

Wednesday, September 3, 2008

Mini Notecards

I just wanted to share a card the I made. It is a 3x3 size card and I used my Cricut to cut out the flowers. It is a perfect size just to do something quick and simple, yet still look nice.

Tuesday, September 2, 2008

Blog Trip - Day 2

Join the Blog Trip!! If you haven't heard about the Blog Trip and want to join us click here for details.


Day two of the blog trip...Welcome to Tucson, AZ and Cape Carteret, NC!!

How Much is Gas?

Katie in Tucson, AZ - I just filled up my gas tank for $3.44/gallon. The price of gas went down a couple of weeks ago in my area from 3.85/gallon. Its so sad, because I thought 3.44/gallon was so cheap!

Amanda in Cape Carteret, NC - The current gas prices here are 3.69/gallon. Maybe I should move to Tucson with Katie. She has the lower gas prices :)

Tutorial Tuesday

Button Shirt to Toddler Dress

Click here
to view this great tutorial on how to turn a mens button shirt into a toddler dress. It is super cute and easy. This is the dress that I made out of one of my husband's shirts that he doesn't wear anymore. My daughter, the picky dresser, likes her new dress and hasn't changed into a different outfit yet so that is a good sign :)

I couldn't decide which picture of the dress I should post so I put both of them on here.

Look at that morning sun shining in!


This next dress isn't much of a tutorial, I just wanted to show it to you! I bought a dress on the clearance rack at Target and thought to myself This looks easy to make. So I had to buy this cute dress so I could have a pattern to look at.

Dress from Target

My version of the dress

Back of dress

She refused to stand up and show off her pretty new dress so this is all I got!

Friday, August 29, 2008

Scrapblocks

I call these SCRAPBLOCKS...

(Probably should have turned the blocks around before I took the picture, so the letters were going the same way)


I finally finished making my scrapblocks. I love them! I saw these in someone's house and attempted to make them myself and it worked. I tried to find a tutorial online on how to make these and I couldn't really find what I was looking for. So I wanted to share with you how to make them if you wanted to. The following is an attempted tutorial.

First, I went and bought a 4x4 from Lowes. Then my husband cut the wood into blocks for me.


Then the sanding began. I tried to sand them by hand, but that made my hand sore and took a long time. So I went and bought a sander. I have to say that I love power tools. The sander was awesome and made the sanding so much easier.


After I sanded the blocks, I wiped off each block so they were clean and there was no more sand dust on them.

Then the fun started! I measured different papers to each side of the block and measured my pictures out. Added embellishments. I used mod podge to glue the papers down and then I put another coat of mod podge over the paper, so it is more durable. I put a letter on each block that spells out "family" when the blocks are all stacked together.

Overall, this is a cute project and I enjoyed making them.